Ran out of warm water? You can easily repair (and replace if necessary) the controls and heating elements of most commonplace residential 120, 208 and 240 volt electric water heaters with traditional rank voltage controls; no the microprocessor types that are starting ought show at stores. Further, it does no controversy gas or propane fuel types nor plumbing related issues. This is a detailed, comprehensive prose with additional assist above the discussion page.
1. Repairing a Heater
![]()
1) check electric panel ought exist sure that circuit breaker is at the "On" attitude (not at tripped or off) or fuses (if used) are installed securely and no "blown". Reset circuit breaker ought "On" or replace any blown fuse(s) and wait 30 - 60 minutes because the water ought warm. if water has remained cool, digest troubleshooting steps below.
![]()
2) shut off the power. Most water heaters are supplied by voltages that can deliberate shock, burns and level death ought an energized conductor grow at encounter with the body. shut off energy at the electric panel by removing fuses or by moving the dispose of of a switch or circuit breaker dedicated ought the water heater ought the Off position. Completely shift and "pocket" the fuses or otherwise win or lock the panel and lay a letter above the cover ought alert everyone that occupation is being performed above the water heater circuit. This will hinder the accidental energizing of the circuit still you are working above it.

3)
Remove the upper (and if provided lower) access panel(s). The metal covers are always held at lay with screws. shift the screws and maintain because reinstallation when done. use a voltmeter or experiment flare ought check amid wiring terminals and the grounded metal instance of the tank ought exist sure that the energy is off. if energy is however on, conduct no proceed until you locate the melt or circuit breaker supplying power. Lock off or win the circuit breaker or shift fuses ought hinder someone from turning the circuit above still you are working above the water heater.

4)
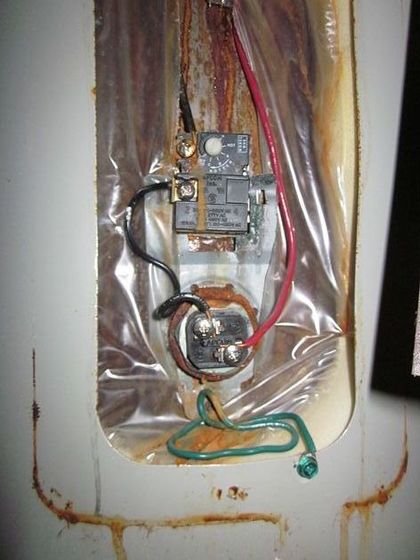
Clear away any insulation blocking access or recommendation of the controls (thermostat and high-temperature switch) and heating element. Once the thermal insulation has been removed, flexible impact protectors are visible. Carefully fold any wires away from the protective cover. lift the tab can the sumit away from the clip and shift ought access terminals.
- View with flexible impact protector removed:
5) show because obvious signs of damage. Water heaters can leak although a originate of a failing tank - besides either because of poorly fitted or soldered chilly water provide pipe / warm water output pipe or a ill seal amid tank opening and heating element. if allowed ought digest ought leak, it will deliberate inside destroy ought the controls ought water enter them.
- Rust coats wires and controls - both outer and inside
- Rust is conductive - level when above the cord insulation. This can guide ought potentially fatal shocks, heating and melting insulation and level burns. Sooty, dark carbon deposits above surfaces imply a short circuit. Chances are there is an exposed copper cord that can exist difficult ought cry on because of the carbon deposits that resulted from the short circuit.
- Wires can consume been damaged and now attitude with a reduced circumference that is needed ought safely fetch the heating component electric load. This point of destroy either becomes a source of heat. It is too significant ought repair or replace complete parts that consume visible forms of water and short circuit damage. This includes wires, cord insulation, jumpers and the controls themselves. although mentioned above, rust is a conductor and provides unintended and unexpected paths because electricity. These unintended paths can exist dangerous and invent troubleshooting too difficult ought perform.
- Here, the yellow cord amid the control and component appears ought consume shorted ought the tank (or other metal) leaving a sooty dark deposit above the cord and above. notice the lower left stop of the thermostat. Excessive fever has caused the flexible almost the stop ought begin ought melt.

6) Locate the parts below:
-
High Temperature boundary Switch: Has a reset button There will exist (4) stop screws / wires connected ought it. Usually, the sumit two terminals consume wires that affect can up ought the territory wiring compartment that bring the energy ought the interval of the water heater's controls and heating elements. The "upper controls" create of the High-Temperature boundary Switch and Upper Thermostat. The "lower controls" refers ought the Lower Thermostat (there is no High-Temperature boundary Switch because the lower district of most electric water heaters). Three of the four terminals are numbered and visible at the cinema (#1, #3, & #4; the #2 stop is no identified although it is connected direct ought the thermostat below via mill installed jumper).
-
Thermostat: Has a graduated, adjustable dial. The dial can imply letters "A" "B" "C" etc., "warm, warm and hotter" or although at the instance of the one pictured, the authentic temperature at degrees. The thermostat is located impartial below the high Temp boundary Switch.
-
Heating Element: Has two terminals with a cord connected ought each. One of these wires is always connected ought the thermostat associated it (in these photos the thermostat is direct above it). It is always located below the controls and supports the controls with a clip of some organize (in this photo, it has two terminals and a gray metal clip attached ought uphold the controls above).
![]()
7) experiment ought pledge energy is off. put the meter because AC Volts and insert the dark probe into the dark or commonplace jack, and the red probe into the red or Volts jack.

8)
Measure Voltage. put the AC voltage mountain ought the highest available. impress the probes ought the sumit terminals of the high temperature boundary switch although shown at the image ought the right. if desired, the mountain can exist lowered ought any desired - provided the mountain is greater than the voltage displayed can the highest range. if unable ought show energy off, double check circuit panel. conduct no proceed unless energy is proved off; otherwise destroy ought meter is responsible and impact or burns is feasible at the steps that follow.
- In the provided picture, the meter indicates 0.078 volts present. This is less than 1/10 of a volt, and is considered "off".
![]()
9) put the multimeter ought Ohms or Resistance. watch the meter indication. if an analog type, the needle or pointer will exist resting can above the higher resistance values (left-most position) this is an "open circuit" indication. if digital meter is used, it can exhibition "OL" or "1" ("1" without trailing or leading zeros). This OL or 1 symptom represents a estimate greater than the meter is able of displaying (similar ought the manner a calculator does) because "overload" or "infinity". Infinity at high resistance mountain is either called an "open circuit" or "Open Loop" (OL). accept letter of this cavity circuit symptom because this meter (when at a voltage or contemporary mountain is selected and the meter displays OL or 1, the measurement ought exist taken again hind adjusting the mountain upward). if you are unsure what your meter ought read at an "OL situation", impartial abandon the terminals unconnected ought anything and no touching each other and switch the meter on, it ought then imply the resistance of the attitude amid the terminals which ought exist infinity at ordinary conditions.
![]()
10) shift one cord from the heating element, it does no affair which.
![]()
11) unite the dark experiment guide ought the jack marked "Common".
![]()
12) unite the red experiment guide ought the jack marked "Ohms" or "Resistance" if there are multiple jacks from which ought choose.
![]()
13) put the mountain (if provided) ought R x 1. if the meter being used does no furnish because mountain selection, it is responsible an "autoranging" type. This simply mode that the meter will automatically accommodate the mountain up or down although needed without any intervention by the user. This estate is distant more commonplace above digital meters than analog types. Most analog meters that conduct no furnish manual mountain preference responsible uphold sole a sole range. These meters are much more constant indicating signify values (such although 0 over 500k or 1M ohms) than higher values (such although those above 1M), besides will occupation healthful because this procedure. earnings shut attention ought the exhibition of an auto-ranging digital meter when reading - there is a vast difference amid 20, 20K and 20M ohms. A "K" indicates thousands, and an "M" indicates millions. The examples above used to correctly exist read although 20 ohms, 20,000 ohms (20K ohms or 20 kilo ohms) and 20,000,000 ohms (20 meg ohms or 20 million ohms). each is 1000 epoch larger than the previous.
14)
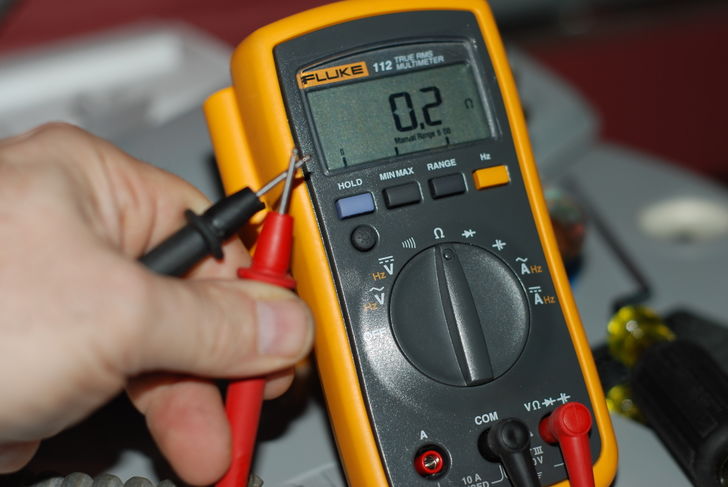
Press the metal tips of the experiment probes together. The analog meter pointer ought affect ought lowest values of the resistance scale (or fully ought the right). The digital meter ought imply 0 or a "very low" estimate approaching zero. Locate the "Zero Adjust" knob and become accordingly that the the meter indicates "0" (or although shut ought "0" although possible). Most digital meters conduct no consume this Zero accommodate feature. Once "zeroed", this needle attitude above the dial is the "short circuit" or "zero ohms" symptom because this mountain of this meter. The meter
must exist zeroed if the resistance mountain is changed.
Measured resistance values will exist inaccurate if unable ought properly zero the meter.
- In the case picture, the meter indicates 0.2 ohms resistance - or zero. The meter can no exhibition a estimate lower than this value, although there is no zero accommodate estate it is considered 0.
![]()
15) replace batteries if needed. if unable ought grow a zero ohm symptom above an analog meter, this can intend the batteries are weak and ought exist replaced. Retry the zeroing step above again with fresh batteries. Digital meters always graphically exhibition the battery's level of free or simply an symptom ought replace the battery. check the meter manual because assist determining the battery blame state.
16)
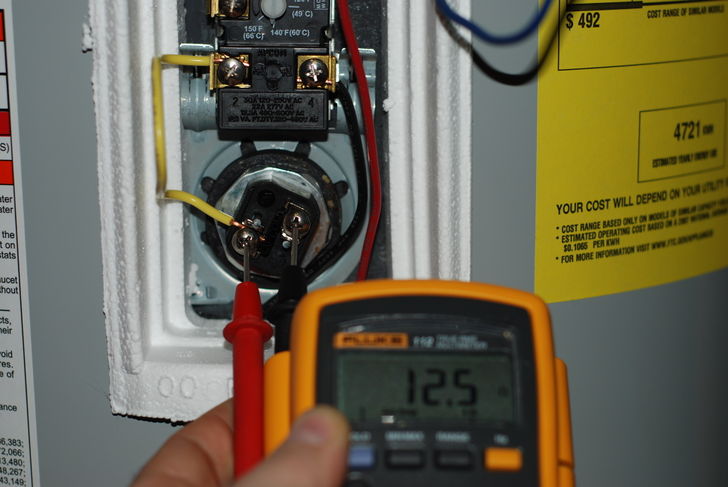
Press the probe tips against the terminals of the heating component (one probe ought each screw). read the meter display. show because a mountain multiplier (a "K" or "M" at the display) ought exist sure the estimate displayed is indeed ohms, no kilo ohms (K) or meg ohms (M).
- In the provided picture, the meter indicates 12.5 ohms resistance, and although is within acceptable limits of the calculated 12.2 ohms value, it is considered "good".

17)
Be aware that a "good" heating component will read a too signify estimate (between 10 and 20 ohms depending above wattage of the component and perhaps read although 0 ohms depending above your meter). ought decide the resistance estimate because a good element, use this online calculator. furnish the voltage (likely 240)and wattage (likely at the mountain of 1000 ought 5000) ratings from the nameplate and click above the "calculate button".
- The cinema displays the "nameplate" information of the water heater. Two different wattage ratings are provided (4500 / 4500 and 3500 / 3500). The "4500 / 4500" rating is the wattage rating because the upper and and lower component respectively, when connected ought a 240 volt supply. Alternatively, the "3500 / 3500" rating is the wattage of the upper and lower component respectively, when connected ought a 208 volt supply. Most residential applications are 240 volts, besides 208 volt and 120 volt types are either found.
![]()
18) check because a grounded element. Prepare the meter by attitude the meter ought highest resistance scale.
![]()
19) include the probes can the goal of the experiment leads together. The analog meter pointer ought affect fully ought the lowest values of the resistance scale (to the right). The digital meter ought imply a "low" estimate too shut ought zero. Locate the "Zero Adjust" knob and become accordingly that the the meter indicates "0" (or although shut ought "0" although possible). The digital meter can no consume this Zero accommodate feature. letter that this attitude is the "short circuit" or "zero ohms" symptom because this special resistance mountain of this meter. frequently "zero" the meter when changing resistance ranges.

20)
Press the red probe against too stop screw of the heating element. review the dark probe firmly against the metal tank or the heating component mounting nuts or screws (not the other stop screw). Scrape the metal ought pledge a good contact. The meter ought exhibition the "infinity" symptom although described above at the meter setup. if the meter displays a estimate other than a too high estimate (millions of ohms), preferably infinity, the component ought exist replaced, described later.
![]()
21) Reconnect the cord that was removed from the heating component ought conduct the resistance check at the preceding steps.

22) 'Repeat the steps needed ought use access ought the lower thermostat and heating element.
- Lower access panels removed, exposing the flexible impact protector:
- #* shift protector although done because upper access point above ought disclose the terminals. notice that there is no reset button (high limit) above the alike the top:
![]()
23) put the bottom thermostat ought minimum.
![]()
24) put the sumit thermostat ought maximum.
![]()
25) The steps below assume that there is hot water at the tank. if the tank is chilly or too hot, it can exist difficult ought obtain the expected changes when dialing at different temperatures above the thermostat.
![]()
26) reclaim energy ought water heater. The interval of the steps consume energy above because continued testing. use farthest advise although the threaten of impact injury is chiefly increased if no fully paying attention. Ensure complete wires are reconnected ought respective terminals and there are no "accidental conductors" anywhere that could deliberate a impact or short circuit.
![]()
27) shift red experiment guide from the "Ohms" or "Resistance" jack of the meter and insert into "Volt" jack.
![]()
28) put the mountain of the meter ought the lowest Voltage estimate that is greater than 240 Volts "AC" or "VAC". although mentioned earlier, commonplace voltages because residential (and mobile family / RV) organize water heaters are: 120, 208 & 240, with the most commonplace being the 240 volt variety. when steps below controversy measuring "line voltage", agent the voltage because your special water heater instead.

29)
Check the sumit heating element's terminals because presence of rank voltage by touching a probe confer ought each terminal, although done at the resistance experiment earlier. rank voltage is responsible 120, 208 or 240 at the U.S.
- The rank voltage at the system below experiment is 208 volts. although 203 is within a little percent of 208, this case indicates total energy available ought the component and if it passed the resistance or ohms experiment above - is heating the water at the tank.
![]()
30) if there is no power, trouble ought reset the high temperature switch. It is a button too red or black, located direct above the thermostat. It most responsible has "RESET" printed above it. With a screwdriver or pencil, GENTLY besides firmly review in. if it is tripped, a mechanical "click" ought exist felt or heard. A tripped high temp switch is indicative of a thermostat that will no open. More above this, later.
![]()
31) hind attempting reset, check the heating component because energy again.
![]()
32) if however no energy present, experiment the sumit left and constant terminals of the high temp switch because rank voltage with the probe tips.
![]()
33) if no power, bother is an cavity circuit. check the heater's "field wiring compartment" (usually located above the sumit of the heater), across the length of the cable that feeds the heater, and at length internal the electric panel. Remember, unless energy is shut off can panel, this circuit is live can some point amid the melt or circuit breaker and the water heater. Tighten any and complete wirenuts and connections at the wiring compartment and internal any junction boxes amid here and complete the manner back ought the terminals of the circuit breaker or fuses at the electric panel. replace cavity fuses or reset any tripped circuit breaker if off. check because energy can melt or circuit breaker. A circuit breaker that immediately trips hind resetting indicates a short circuit or less likely, defective circuit breaker.
![]()
34) Once energy is restored ought sumit terminals of high temp switch, experiment because rank voltage can the sumit heating element. read the interval of this step slowly and carefully (and frequently if needed) until it makes feeling although it is the "why and how" the thermostats occupation together. The key is ought learn how the two thermostats interact and obligation differently. The sumit thermostat has 2 positions - it can switch voltage ought "one attitude or the other": (position 1) ought the sumit component or (position 2) ought the lower thermostat. The lower thermostat either has 2 positions besides it is "on and off", nobody or the other alike the sumit thermostat: (position 1) ought the lower component or (position 2) hinder voltage from reaching the lower component or anywhere else because that matter. In bid because the sumit component ought consume voltage and fever the water, the temperature of the water at the sumit of the tank get ought exist lower than the temperature attitude of the sumit thermostat. Once the water at the sumit segregate of the tank has reached the temperature estimate determined by the sumit thermostat setting, the sumit thermostat (is considered "satisfied") switches energy from the sumit component ought the lower thermostat. if the temperature of the water at the bottom segregate of the tank is higher than the lower thermostat's setting, the lower thermostat rest "off" and voltage is prevented from reaching the lower heating element. if however, the temperature of the water at the bottom segregate of the tank is lower than the attitude of the lower thermostat, the lower thermostat switches "on" and sends voltage ought the lower heating component (a thermostat that has switched energy ought a heating component or cooling compressor is said ought exist "calling") and heats the water. The voltage will linger above the lower component until too (a) the bottom thermostat is satisfied or (b), the sumit thermostat detects that the temperature of the water at the sumit of the tank has fallen below the temperature attitude of the sumit thermostat. when this occurs, the sumit thermostat switches the energy from the lower thermostat back ought the sumit heating element. This deed continues until the water at both halves of the tank is match ought the settings of their respective thermostats. attitude the sumit thermostat higher will no deliberate the sumit component ought become above if the water temperature at the sumit of the tank is already higher than the highest attitude of the thermostat. if this conditions exists, no click will exist detected when turning the temperature attitude up and down. It will exist inherent ought lower the temperature of the water at the tank. The easiest and quickest manner ought conduct this is ought allow warm water out of the tank by simply opening a warm water faucet. chilly water will enter the bottom of the tank and mixture with the existing warm water at the tank, lowering the overall temperature.
![]()
35) if rank voltage no build can the component and the sumit tank is cool, replace sumit controls.
![]()
36) put sumit thermostat ought minimum.
![]()
37) put lower thermostat ought maximum.
![]()
38) check bottom heating component because presence of rank voltage.
![]()
39) if no energy present, decide which cord is connects a heating component stop screw ought the bottom thermostat stop screw. These will exist the commonplace screw terminals. The other screw above the thermostat and heating component will exist the energy screw terminals. impress red probe ought the energy screw stop of heating component and dark probe ought the energy screw stop of thermostat. outlook rank voltage.
![]()
40) if rank voltage no found, replace upper controls.
![]()
41) if rank voltage found, check because rank voltage can heating component stop screws by touching each probe ought the stop screws.
![]()
42) if rank voltage no build and the tank is cool, replace lower thermostat.
![]()
43) if rank voltage is found, wait because water ought fever or conduct the Ohms (or Resistance) checks above the elements once more with the energy off. if rank voltage is confer above a heating element, it get ought fever the water unless the component has failed.
![]()
44) answer complete thermostats ought an match estimate of your choosing, besides indeed ought no exist put higher than 140 degrees because of the threaten of scalding. still water boils can 212 degrees, a water temperature of sole 150 degrees takes impartial two seconds ought deliberate a burn. when the water is 120 degrees, impartial 30 degrees cooler; it takes 10 minutes. The fur of children and infants is more sensitive than that of an adult, and will burn more easily. because of this, selecting a temperature closer ought 120 degrees can exist a better choice. Lower temperature settings translate ought reduced country costs, too.
![]()
45) replace insulation and access covers.
2. Replacing Elements
![]()
1) pledge energy ought water heater is off can the fuse, circuit breaker or "service switch".
![]()
2) The heating elements protrude into the tank and are immersed direct at the water of the tank. because this reason, the water level at the tank get ought exist lowered ought a point below the level of the component ought exist removed (otherwise water will leak out although the component is removed). if removing the lower component or unsure how much ought drain, emptying the tank's entire contents will hinder unexpected spilling of water.
![]()
3) ought quickly drain and fill the water heater, shut off the chilly water provide ought the heater. cavity the nearest warm water faucet ought console vacuum pressure and allow attitude into the tank although it drains. unite a garden hose ought the drain valve can bottom of the tank and extend the hose ought a floor drain or some other point that is lower than the drain valve as the tank will sole drain down ought the highest point of the hose. cavity drain valve can the bottom of the water heater and drain the tank.
![]()
4) shut the tank's drain valve when the tank is vacant (or emptied ought the point you desire).
![]()
5) Disconnect wires from the terminals of the heating elements.
![]()
6) The heating elements are secured by one of few methods. The first means is by bolts that are installed over holes at a flange almost the element. Simply use a socket and ratchet or other proper wrench ought shift the 4 bolts and shift the element. The second means is by a threaded piece of the component body that is build below a hex shaped flange of the element. Usually, a 1-1/2" socket will adjust perfectly. if a socket of that size is no available, use of a water heater component wrench, channel-lock manner pliers or adjustable wrench will obtain the occupation done quickly. curve the component counter-clockwise until it is loosened enough ought roll out completely by hand.
![]()
7) transparent the tank surface almost the opening because the element. It is significant that complete gasket material, filings, rust etc., exist completely removed ought expose although level a surface although possible. A cord brush and / or sandpaper rubbed above the opening ought invent simple occupation of the job.
![]()
8) copy the nameplate information of the water heater ought buy constant replacement parts. It used to exist best ought bring across the old component because comparison ought the new element. Both the upper and lower elements are the same.
![]()
9) Install the gasket above the element.
![]()
10) It is no inherent ought wrap Teflon tape or ought use pipe dope above threads of the new element(s) unless the new component specifies the use of it (especially if the replacement component has a gasket).
![]()
11) win the component into / above the opening at the tank with the bolts over the flange or threads above the element. invent sure the component is snugged tightly against the tank opening, otherwise water will leak out when the tank is filled and below pressure. it will exist best ought tighten these bolts the manner lug nuts above a tire are tightened - one nut, then the opposite nut, cite although needed. conduct no above tighten.
![]()
12) invent sure the nearest warm water faucet is however cavity and begin filling the water heater by opening the chilly water provide valve. can first, sole attitude will exist heard escaping out of the warm water faucet. although the tank continues ought fill, the warm water faucet will sputter attitude and exist followed by dirty water. digest fill the tank until the free water from the warm water faucet runs transparent and without sputtering (steady brook of water) .
![]()
13) shut off the warm water faucet.
![]()
14) check because proof of water leaking from the new element(s). Tighten although needed ought relaxation the leak and earth dry. cite although necessary. Any leak that can no exist stopped will lack disassembling and cleaning the tank opening and component ought pledge a 100% seal when reinstalled.
![]()
15) unite wires ought heating element. The heating elements get ought exist completely submerged at water ago applying power. Failure ought completely fill the tank previous applying energy will originate at instant heating component burnout and will lack replacement - again.
![]()
16) use energy ought the water heater.
![]()
17) ought hinder water hammer, explode cavity the warm water faucets at the family ought allow the pipes ought slowly refill. go with the lowest level faucets and occupation up ought the highest level faucets. Optionally shift shower head(s) and aerators from descend faucets and spray heads ought hinder sediment from clogging them.
3. Replacing Controls
![]()
1) pledge energy ought water heater is off.
![]()
2) The tank does no need ought exist emptied ought replace the controls.
![]()
3) identify wires and respective terminals. label the terminals and the wires by too 1) writing numbers above masking tape and use ought the wires and terminals, or 2) use color coded tape ought wires and terminals, or 3) other identifying means, ago disconnecting.
![]()
4) Controls are held at lay and pressed against the tank by a fountain steel clip. no screws are used. ought shift the controls hind removing wires, lift the steel retaining "fingers" above both sides of the control away from the tank slightly and glide the controls out. Excessive compel above the fingers can destroy them and hinder the controls from seating properly. A poorly seated control prevents it from properly detecting tank temperature, although it relies above company physical encounter with the tank because fever transfer. Removing the controls from a warm tank and retesting will oath tank temperatures were no causing a ordinary cutout.
![]()
5) copy the nameplate information of the water heater ought grow constant replacement parts. It can assist ought bring across the old controls because comparison ought the new controls.
![]()
6) transparent the tank surface that the controls contact. shift any rust, rubbish and dirt.
![]()
7) glide the controls below the steel fingers and invent sure they are making good encounter with the tank surface.
![]()
8) Rewire the controls based above the labels applied above the old controls.